Clone this: https://github.com/mnagel/gnome-keyring-dumper
Run python gnome-keyring-dumper-ng.py
 RoboCoffee
Clone this: https://github.com/mnagel/gnome-keyring-dumper
Run python gnome-keyring-dumper-ng.py
It’s been a while since my last blog post Hacking Brightway scooters: A case study. I’ve picked up their most recent scooter, the Xiaomi 4 Pro (2nd gen) to see what’s changed in Brightway’s security practices. And, spoiler alert, they really did step up their game! Brightway evolved an open system (3 Lite, 4, 4 Lite, …) into the most modding-unfriendly device one can imagine. Unfortunately, also at the cost of performing repair and maintenance.

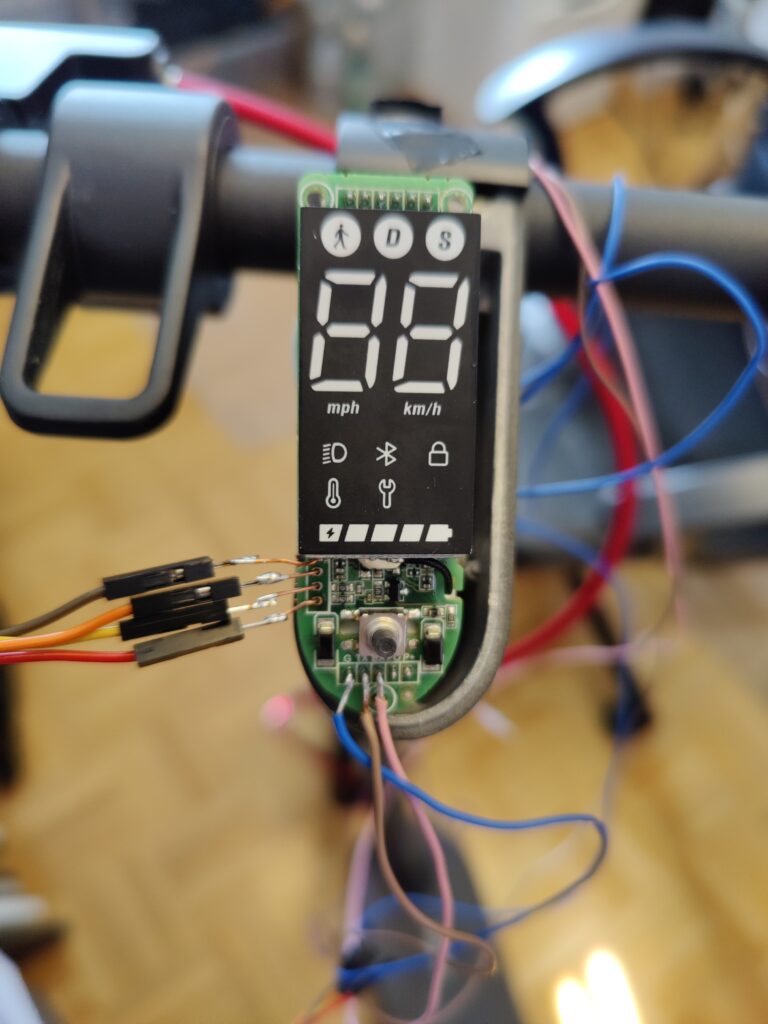
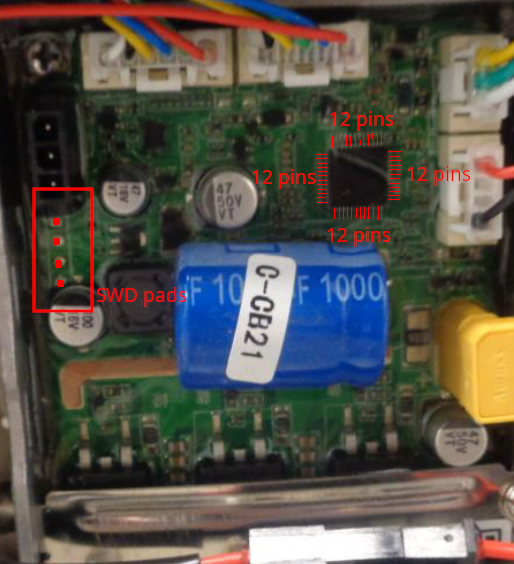
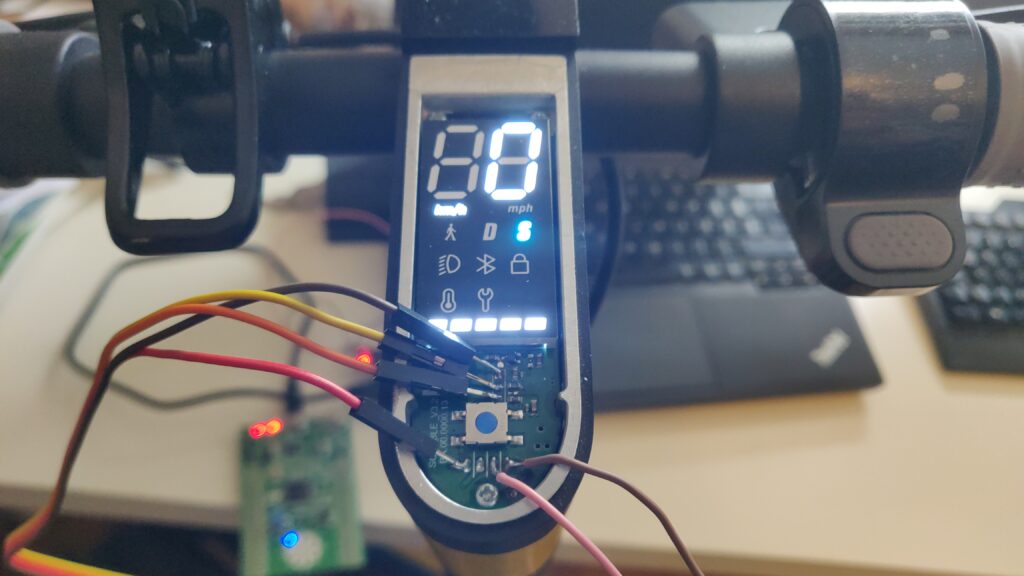
Brightway has secured the BLE chip, which is the heart of the dashboard, from external access that would normally be possible via SWD. Any access attempt from the DP (debug port) is denied. According to the manual, the SWD can be locked down with a password that is stored in an „eFuse“ (=EEPROM). In addition to that, an encryption key for encrypting the firmware can be stored in the eFuse. I don’t know if that’s the case here, but certainly the password mechanism is in place. The password has to be sent via HCI UART to the chip using a special programming tool (Windows). SWIO / SWCLK / TX / RX pins are exposed as pads at the bottom of the front side of the dashboard module.
Without knowing the password, the DP cannot be unlocked. This path will not be explored any further because of time constraints … and because I don’t like Windows.
Unlike before, the controller (MCU) is no longer easily programmable. Here’s a list of new measures undertaken by the manufacturer to secure the device against tampering:
Even though RDP Level 1 is in place, the firmware can be extracted using a specially crafted attack. I’m not going to disclose how, but let me say it’s a known tactic.
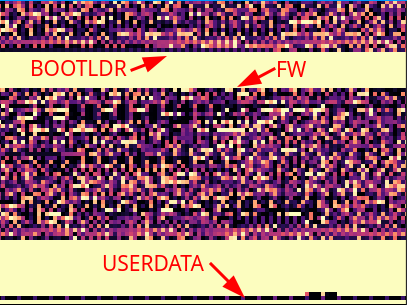
The firmware in fact consists of two firmwares: DFU bootloader and main firmware (incl. bootloader). Depending on the flash configuration, either one or the other is mapped to memory location 0x0. Upon entering DFU mode, e.g. when updating the firmware, the DFU bootloader starting at flash address 0x8000000 is mapped to 0x0 and the controller is restarted to boot that code. After a successful program attempt, the firmware starting at address 0x8003000 is mapped to 0x0 and the controller is restarted to boot up the firmware.
There’s also the usual user data section, containing board serial number (SN) and scooter SN… but also a special 16 byte UID, which will be important in a short moment!
There are two possible ways to load firmware to the controller: SWD (relatively easy) or using the DFU process (hard). The first one is interesting, but we’ll dig deeper into the second approach.
When I first tried to reverse engineer the UART protocol implemented by Brightway I failed miserably. This time I didn’t! A standard two-wire UART (TX+RX) implementation running at baudrate 19200 (8 bit, 1 stop bit, no parity) is used. With that said, sniffing the UART traffic is straight-forward to understand the messaging protocol.
I’ve recorded the messages exchanged during a firmware update to replicate the DFU process, which can be outlined as follows:
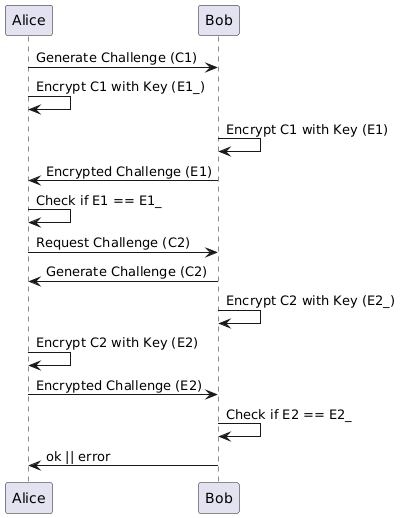
Step 1 is arguably the most difficult one to hack due to the custom key derivation and verification. You remember the special 16 byte UID mentioned before? Turns out, this UID is used to generate a shared key in a key-derivation process. A series of custom routines scramble this UID into a longer byte sequence (the shared key), which is then used to scramble a random 16 byte challenge sent by the other party and return the 16 byte scrambled response. Since both parties scramble in the same deterministic way, the expected response is calculated in advance and checked against. If this confuses you: the figure below explains it better.
When sending firmware packets, the checksum of the packet and the checksum of each data chunk is included as part of the message. However, the chunks / packets themselves are transferred unencrypted, i.e. they’re not encrypted using the shared key. Either way, it wouldn’t increase security by much, since the same update file can be acquired from the mobile device as well and more easily.
Brightway has learned from their past and locked down both BLE and MCU as the essential components to the integrity of the scooter. A) Access to the BLE is secured by a password. B) Access to the MCU flash is secured by RDP Level 1.
In addition to the known firmware signing, specific measures have been implemented to prevent installation of (modified) firmware. A) The initiation of the DFU process is secured with a shared key and a custom key-derivation function. B) Modified firmware (with wrong checksum) is rejected by the MCU’s DFU bootloader.
Obscure component choices and bad programming habits further enhance the security.
Yet, there’s one glaring problem that overshadows all aspects of added security: Brightway has created a scooter that is impossible to repair. The way the controller is installed into the chassis is extremely maintenance-unfriendly. Since spare parts are practically unavailable for most Brightway scooter models, including this one, buyers with an expired warranty and a malfunctioning controller have little option other than selling the entire scooter for parts.
Brightway (Brightway Innovation Intelligent Technology (Suzhou) Co., Ltd.) produces scooters for the NAVEE and Xiaomi brand. The latest additions to the Xiaomi portfolio are the Electric Scooter 3 Lite, 4, 4 Pro and 4 Ultra. With exception of the 4 Pro, all are produced by Brightway. If you’re hearing the name Brightway for the first time and want to learn more about every Xiaomi scooter released, check out my previous blog post.
The cheapest Xiaomi/Brightway model is the 3 Lite. It costs almost the same as the Xiaomi/Ninebot Mi 1S, but has somewhat weaker specs, such as a 5200mAh instead of a 7650mAh battery. So what’s the point of buying this seemingly inferior scooter? Well… it’s security research! By studying the inner workings of the 3 Lite, both from a hardware and a software standpoint, we can shed a light onto how serious Brightway takes security in their scooters.
In this blog post, I will be dismantling my newly bought 3 Lite scooter. After an initial introduction, I’m giving insights into the pairing and activation procedure, after which I describe the available registers, the command and message format and the structure of the serial numbers. It follows a detailed description of all the hardware and respective SOC memory layouts, after which I look at the UART and BLE protocols. Lastly, I will talk about the obvious security flaws discovered in the 3 Lite and how this relates to all other new Xiaomi scooter models.
In this section, I’ll be giving a short overview over the essential scooter components, for those of you who are not familiar with previous Xiaomi models or electric scooters in general.
Even though riding the scooter is possible without any app whatsoever, Xiaomi requires you to watch a training video and prove that your the legitimate owner of the vehicle. Only after this is done, restrictions imposed upon speed and such are lifted. Apart from that, an app is helpful for reading or controlling scooter parameters (more in section „Info registers“).
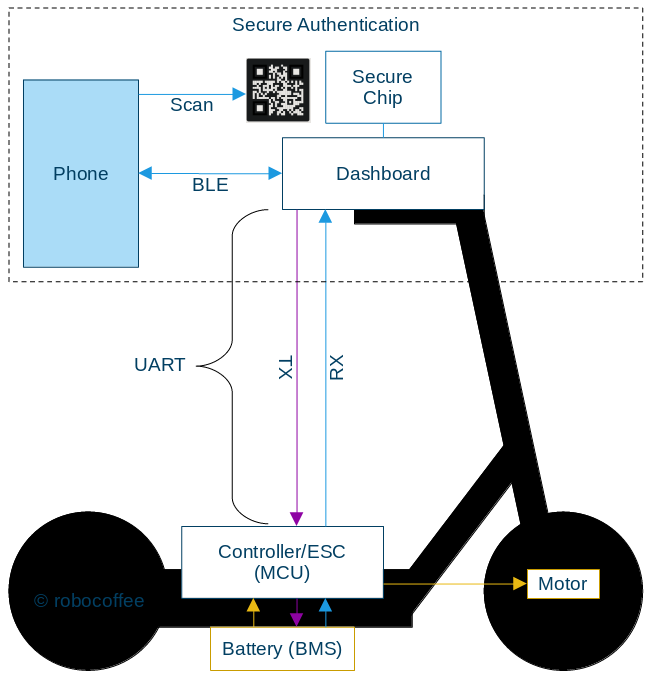
Several components are involved in the communication between your phone and the scooter. The communication process is the following:
To ensure device security, each one of these components and pathways needs to be secure.
Xiaomi started rolling out a stronger bonding mechanism with the 3 Lite and 4 Pro models. For connecting with the scooter, you have to download the Xiaomi Mi Home app. After scanning for scooters and selecting your 3 Lite scooter, the app asks for the camera permission. Now, you scan a QR code that’s printed on top of a sticker that covers the dashboard. After the QR code is verified by the app backend server, you’re connected. A button press is no longer required.
The QR code is stored in the app and can be viewed while being connected to the scooter. The app tells you to take a screenshot of the QR code in case you lose the original one.
Usage note: Every time you remove the scooter from the app and re-add it, you have to scan the QR code. However, the verification fails unless you do a BLE hard-reset first (throttle + 5x button press).
When you first turn on the 3 Lite it will constantly beep and be speed-limited to 10 km/h. Just like with previous (Xiaomi/Ninebot) models, you have to activate it. The activation button becomes available after watching the usual introduction video in the Mi Home app.
I’m greeted by a firmware update dialog immediately after connecting to the scooter. This update is not mandatory and the dialog can be dismissed.

At this point, I will refer to the Mi Home scooter app as the „Brightway plugin“. The way Mi Home works is that it provides an API which vendors can use to integrate their hardware, as a plugin. Now, since the 3 Lite is produced by Brightway, their plugin looks and feels different from the Ninebot plugin some us of are used to. Nonetheless, the provided functionality and available information is equivalent. By looking into the Brightway plugin script source code, we can locate all register addresses with their respective functions (typos included [sic]).
| Address | Function |
| 00 | BACTH_REPORT |
| 01 | DRIVE_MDOE |
| 02 | BATTERY_LEVEL |
| 03 | REMAINING_MILEAGE |
| 04 | FAULT |
| 05 | CURRENT_MILEAGE |
| 06 | AVERAGE_SPEED |
| 07 | LOCK |
| 08 | CRUISE_CONTROL |
| 09 | TAIL_LIGHT_ALWAYS_ON |
| 0A | ENERGY_RECOVERY_INTENSITY [Weak=1E, Middle=3C, Strong=5A] |
| 0B | TOTAL_MILEAGE |
| 0C | RUNNING_STATUS |
| 0D | RECENT_DRIVING_LOG |
| 0E | DRIVING_Duration |
| 0F | TOP_SPEED |
| 10 | BATTERY_STATUS |
| 11 | BATTERY_TEMPERATURE |
| 12 | BATTERY_DATE_OF_MANUFACTURE |
| 13 | BATTERY_SN |
| 14 | BMS_FIRMWARE_VERSION |
| 15 | SERIAL_NUMBER |
| 16 | FIRMWARE_VERSION |
| 17 | SCOOTER_TEMPERATURE |
| 18 | RESUME_TO_DEFAULT_SETTING |
| 19 | REMAINING_BATTERY |
| 1A | BATTERY_VOLTAGE |
| 1B | BATTERY_CURRENT |
| 1C | BATTERY_POWER |
| 1D | LOCK_WARNIING |
| 1E | MILEAGE_UNIT |
| 1F | ACTIVATION_DATE [4 bytes] |
| 20 | OOB_CODE |
| 21 | CHECK_TIRE_DATE |
The Brightway plugin script gives further insight into the command types and how a package is defined.
| Type | Command |
| 01 | WRITE |
| 02 | COMMAND |
| 03 | READ |
| 11 | MCU_WRITE_RESPOND |
| 12 | MCU_COMMAND_RESPOND |
| 13 | MCU_READ_RESPOND |
| 14 | MCU_REPORT |
A package consists of DATA plus the checksum of DATA. A custom function is used to calculate the checksum. DATA is defined as follows:DATA = TYPE + ADDRESS + REST + LEN + PAYLOAD
TYPE is a command type (see table)ADDRESS is a register address (see table)REST is the number of packages remaining, in the case where multiple packages have to be sendLEN is the length of the PAYLOADPAYLOAD is the actual hex values to transmitBoth the command sent to the scooter and the commands received follow this format specification.
Brightway scooters have a 20-character SN format:5-digit prefix + '/' + 14-character suffix.
The SN prefix is used to identify different regions. The following table shows all known prefixes for the 3 Lite (valid prefixes start with a ‚3‘) and their restrictions.
| SN Prefix | Region | BacklightOn | CruiseControl | Speed |
| 37707 | DE | ❌ | ❌ | ❌ |
| 37713 | ?? | ❌ | ❌ | ❌ |
| 37708 | ?? | ✅ | ❌ | ❌ |
| 37712 | ?? | ✅ | ❌ | ❌ |
| 37701 | ?? | ❌ | ✅ | ✅ |
| 37714 | ?? | ❌ | ✅ | ✅ |
| Others | Global | ✅ | ✅ | ✅ |
SNs are stored on MCU (ref. 0x93FC in EEC0130, 0x23f14 in image) but read and processed by BLE (ref. 0x1e63e in MCU0214).
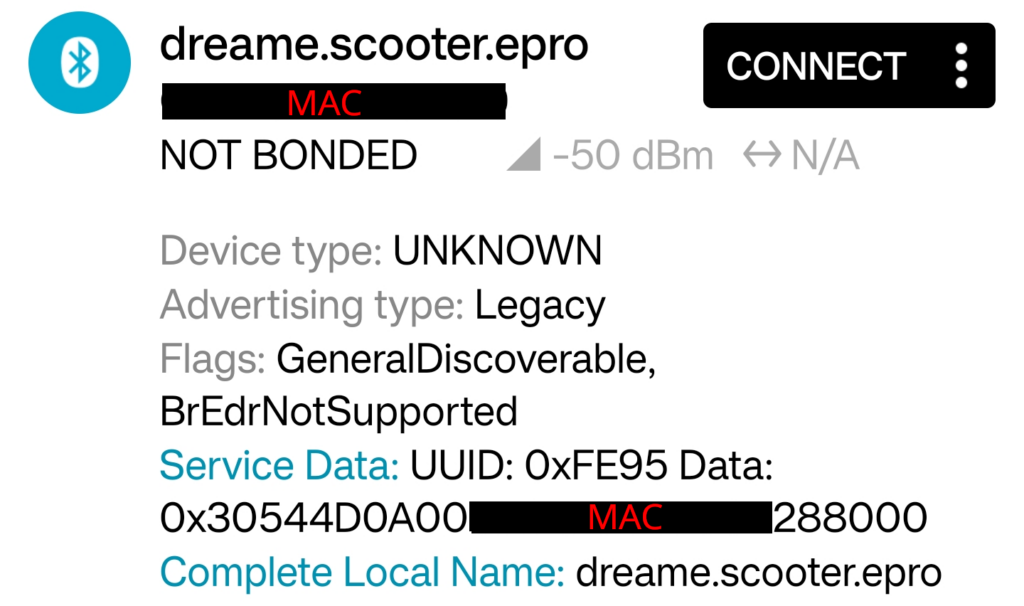
The 3 Lite broadcasts the BLE device name „dreame.scooter.epro“. The naming choice isn’t surprising: in my last blog post I explained the relation between Brightway and Dreame.
The 3 Lite provides a BLE GATT service for authentication and another service for TX/RX and broadcasting the button press using the followings UUIDs:
For BLE authentication the Brightway plugin uses MIOT BLE SecurityLock: encryptMessage() and not encryptMessageWithToken(). What’s the difference, you ask?
encryptMessage() uses MIOTBluetooth.encryptMessageXiaoMiBLE() -> securityChipEncrypt() [Same as StandardAuthEncrypt()] -> ECDH with secp256r1 curve (we know this crypto)encryptMessageWithToken() uses MIOTBluetooth.miotBleEncrypt() -> miotBleEncrypt() -> BLECipher (MixA, MixB, old crypto)We already know the type of encryption/decryption scheme used. What’s new is the call of the function securityChipEncrypt(). Wait, what… Security chip? Very interesting! A BLE packet sniff reveals an exchange of certificates, likely related to the QR code. Further, memory footprints contains records of a 7-step authentication process involving the secure chip. This is a noticeable divergence from previous authentication methods.
Unverified: Since the QR code is used for bonding, it likely contains data which can only be decoded by the Mi Home app. This data could be the certificate (public key) that is transmitted in the key-exchange.
The following section identifies all ICs used by the manufacturer. This is a necessary step for the examining device security and the potential for modification.
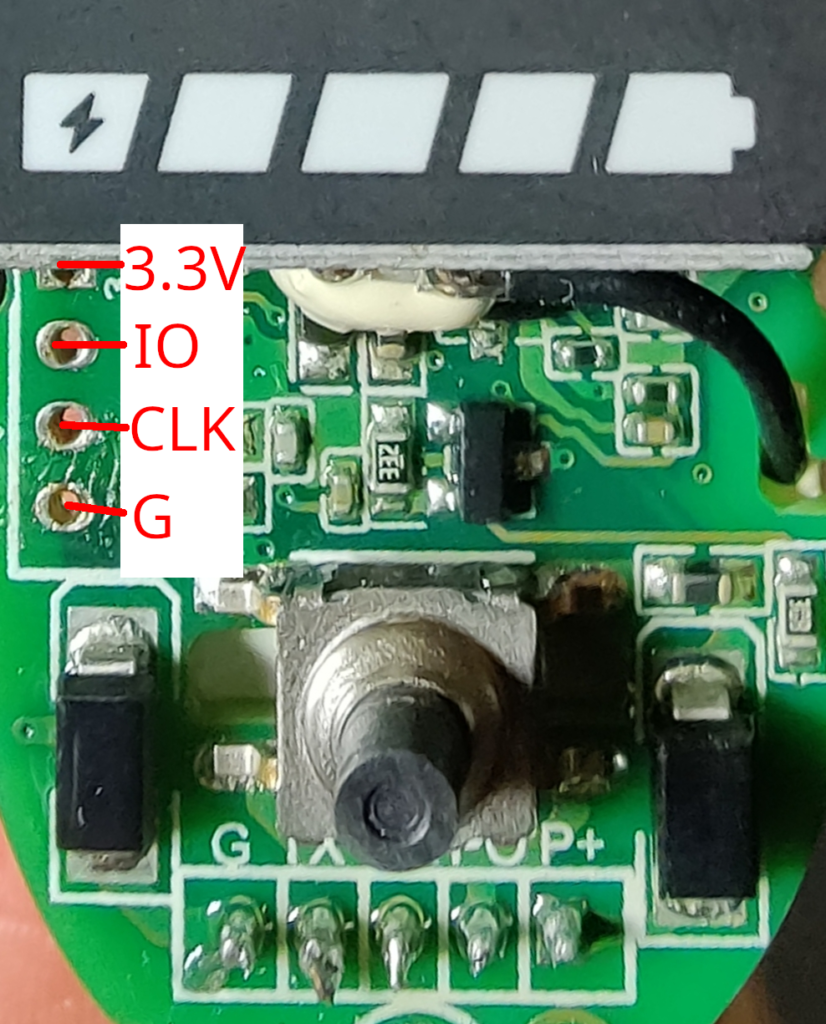
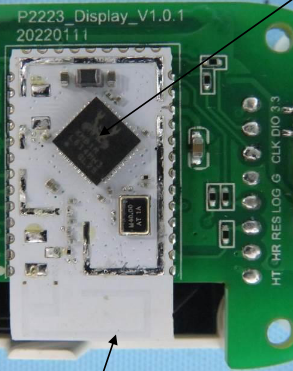
Starting with the dashboard, it has the label „P2185_Display_V2.0 211126“ printed on it. The dashboard looks almost identical to the „P2223_Display_V1.0.1 20220111“ of the NAVEE S65. Luckily for us, both boards expose them SWD ports! The P2223 has all SWD pins labeled, the P2185 has not (but, it’s easy to find out). Check the image below for the correct SWD pin assignment.
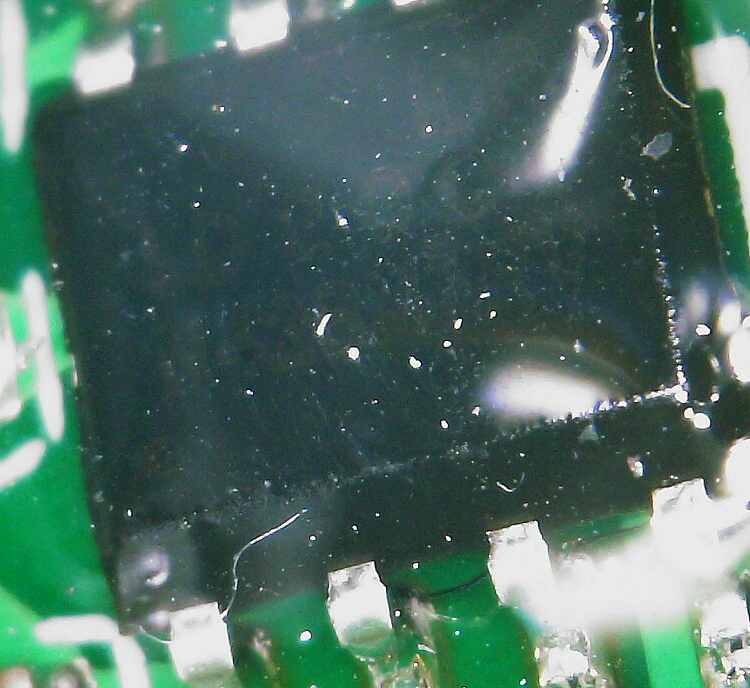
We already observed the app code hinting at the existence of a secure chip. When first examining the hardware, I could not find any such chip. Only with the help of my microscope and zooming into one of the small ICs on the dashboard I could locate a component that turned out the be the legendary „MJA1“ secure chip!

| Vendor | Part number | Function |
| Xiaomi/Realtek | MHCB05P-IB module with RTL8762C chip | BLE Mesh |
| Xiaomi | MJA1 HCIW | Secure chip |
| ??? | ??? (hidden underneath display) | 20-Pin Display driver IC |
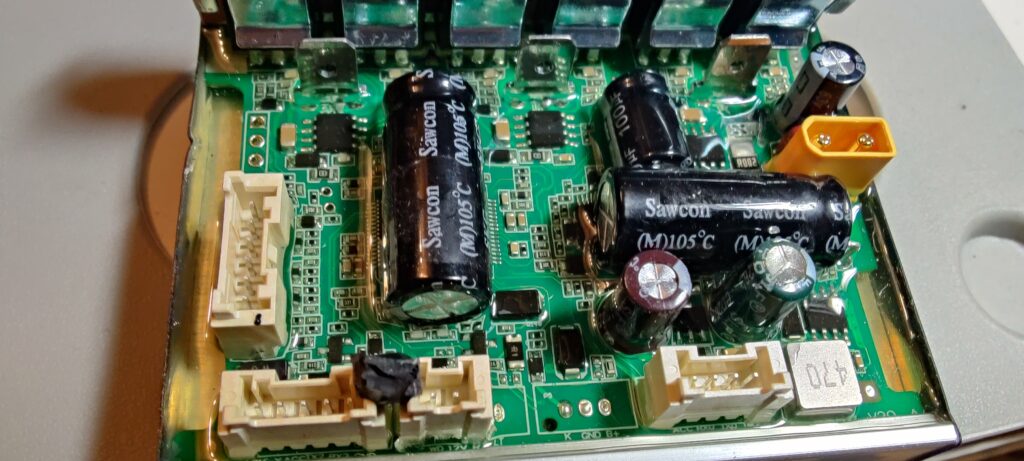
As for the ESC, the part numbers are difficult to read, since the board is potted in a thick layer of transparent encapsulation resin (too thick to be conformal coating). Nevertheless, I could identify all but one component with my microscope, by using its integrated light source past the reflective layer.
| Vendor | Part Number | Function |
| Linkosemi | LKS32MC081C8T8 | Motor control unit |
| Thinkisemi | P55NF061 | N-channel power MOSET |
| Silan (SL) | SD4931 | Current mode PWM controller |
| Samwin | SW062R08E8T | 6x N-channel enhanced mode MOSFET |
| ??? | IDR??ID200??N428M7RV? | ??? |
Having identified all hardware components, it took me quite some time to gather the relevant documents and get a clear understanding of the SoC characteristics. This section lists the specs and the memory mapping table of each SoC.
| Type | SOC | Family | Arch | RAM | ROM | Flash |
| BLE | RTL8762C (MHCB05P) | Cortex-M4 | ARMv7-M | 128KB | 384KB | 512KB |
| MCU | LKS32MC08x | Cortex-M0 | ARMv6-M | 8KB | 1KB | 64KB |
| Area | Start address | End address | Size | Function |
| ROM | 0x0 | 0x5 FFFF | 384KB | Bootloader, BT-Stack, Flash driver |
| RAM (Data) | 0x20 0000 | 0x21 BFFF | 112KB | RAM code |
| > ROM Data | 0x20 0000 | 0x20 2FFF | 12KB | Variables of ROM |
| > Main Stack | 0x20 3000 | 0x20 37FF | 2KB | MSP |
| > Patch RAM1 | 0x20 3800 | 0x20 7BFF | 17KB | Variables/RAM code of Patch |
| > APP/Data RAM | 0x20 7C00 | 0x21 7FFF | 65KB | Variables/RAM code of APP + Data heap |
| > Patch RAM2 | 0x21 8000 | 0x21 BFFF | 16KB | Optional, same as Patch RAM1 |
| RAM (Cache) | 0x21 C000 | 0x21 FFFF | 12KB | Speed up SPI Flash R/W |
| SPI Flash (Cached) | 0x80 0000 | 0x9F FFFF | 512KB | With cache (faster) |
| > Reserved | 0x80 0000 | 0x80 0FFF | Reserved | |
| > OEM Header | 0x80 1000 | 0x80 1FFF | Config: BT address, AES Key, flash layout | |
| > OTA Bank 0 | – | – | Data and code | |
| > OTA Bank 1 | – | – | Same as Bank 0 | |
| > FTL | – | – | Access flash with logic address | |
| > OTA Temp | – | – | OTA backup | |
| > APP Defined | – | – | User defined |
| Area | Start address | End address |
| FLASH (NVR) | 0x0 | 0x3FF |
| FLASH (MAIN) | 0x0 | 0xFFFF |
| RAM | 0x2000 0000 | 0x2000 1FFF |
| SYS CTRL | 0x4000 0000 | 0x4000 03FF |
| FLASH CTRL | 0x4000 0400 | 0x4000 07FF |
The bus between dashboard and controller is no longer realized by a single-wire (1-wire) UART, like in previous Xiaomi scooter models. The 3 Lite downright uses the standard UART mode: one wire for TX, one wire for RX. The MCU-UART is configured as follows: baudrate = 19200, data length = 8 bit, stop bit len = 1 bit, LSB, even parity, check disabled, multi-drop disabled.
Curiously, my recordings do not contain messages, but pulses with three possible state values.
| Value | Meaning |
| 20 | floating(F) |
| 30 | low(L) |
| 65 | high(H) |
A single pulse follows the pattern: F[H|L][H|L]
In reality, only two of the four possible combinations are used: FLL, FHL. We can conclude that FLL translates to „0“ and FHL translates to „1“. I visualized the sampled data using a tool called binocle, which helps identifying recurring patterns.


At the time of conducting the experiments and recording the UART transmission, I didn’t know about the correct parameter stated in the first paragraph. For recording the data, I used a higher baudrate than specified by the MCU. Please leave a comment, if you can verify seeing similar values and patterns in your recording with the correct baudrate set.
If we assume these captures to be accurate, then it means that both the BLE and MCU have a buffer to store incoming packets and then translate them back to messages, as defined in the „Commands and message format“ section.
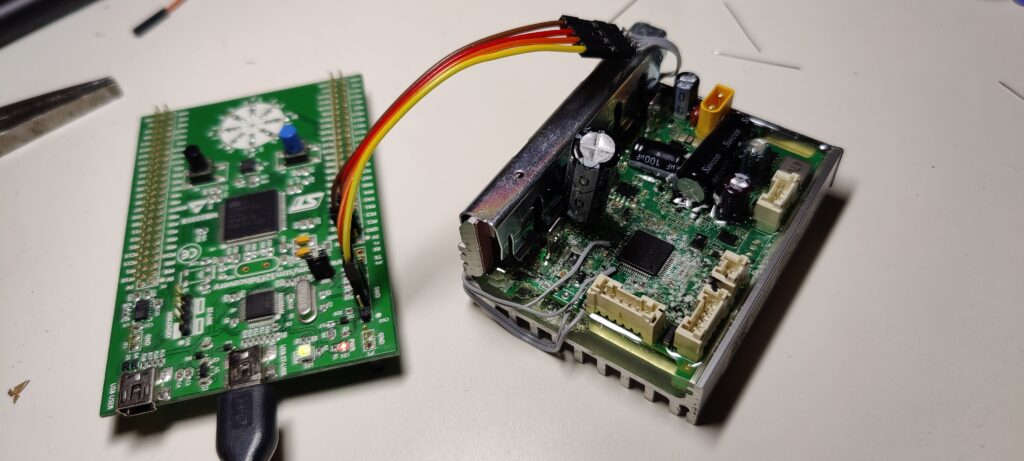
Both the dashboard and controller board expose debugging pins (SWD). These have been left active and allow connection via OpenOCD. I quickly discovered the first security oversight by Brightway: the manufacturer left the content of both SOCs unprotected! I was able to generate full dumps of both BLE and MCU firmware, without any special measures, following the memory mapping tables laid out above.
The second oversight is that the firmware update (OTA) files for both the BLE (called „EEC“) and MCU come unencrypted, meaning that they can be decompiled without further measures. Analysis of these files allowed me draw some of the conclusions in this blog post, e.g., about the UART configuration. I could further observe that the MCU firmware, being very limited in size, contains almost no logic and that its main purpose is motor control.
Last year, Xiaomi introduced firmware signing to secure the BLE firmware from tampering. The BLE/EEC firmware for 3 Lite is signed in accordance to this new Xiaomi standard. However, the MCU firmware is not! This could potentially allow altering the content of the update (OTA) file before passing it to the BLE. This has the hard requirement of having the authentication and update procedure fully reverse-engineered.
What’s strange about the MCU firmware OTA file is that it’s almost three times larger than the MCU flash size. Next to the MCU flash/app content, this file contains one large code section of what seems to be executable DFU loader code and another section of what seems to be executable post-installation / setup code. Should it prove to be correct that the MCU OTA file is packed with executable code that the BLE willingly executes, one could try injecting their own code. This has a potential to defeat every security measure mentioned so far, but also serious implications for the scooter safety. But again, proving this would require full knowledge of the authentication and update process.
While the authentication process (pairing with QR code, secure key exchange) doesn’t seem to have any obvious flaws, Brightway has left room for debugging and possible modification of the scooter. It is a misunderstanding that authentication with a secure chip provides absolute security. It’s main safety mechanism is to prevent tampering with the device of someone else, because we don’t have the QR code (certificate) to pair with that (secure chip). The secure chip doesn’t prevent you from hacking your own scooter. This is how it should be!
The Realtek BLE module uses SPI to communicate with the flash. The (unsurprising) fact is that this module doesn’t allow writing bytes to the memory-mapped flash directly. The RTL8762C SoC comes with a feature called block protect and the manual states the following regarding write protection: „The protected flash zone can’t be written and erased. If necessary, user can unlock flash first, and then write or erase, finally lock the flash to the previous level.“ Realtek provides both an API for reading and writing to flash and tools for programming. This means that flashing a custom firmware to the BLE module is just a matter of figuring out the correct programming procedure!
As for the MCU: If you’re familiar with the flash controller in STM32, the LKS32 MCU isn’t too different. It has a register for enabling the programming mode, a register for the address to program and a register for the data to be written to that address. In my tests, writing single bytes (words) using the LKS32 flash controller was unsuccessful (also, writing single bytes to the memory-mapped flash didn’t succeed). Based on hints in the manual, it’s very likely that a prior erasure of the flash region to be written to is necessary!
Up to this point, everything I did so far was non-destructive. In order to not risk bricking my newly brought scooter and keeping the factory settings intact, I bought a much cheaper Xiaomi device that comes with the exact same BLE module for experimentation. Both devices contain the exact same ROM image and there’s no setting (so called „eFuse“) in EEPROM that might potentially disable flashing. Therefore, the process and outcome of flashing the scooter BLE module is expected to be exactly the same.
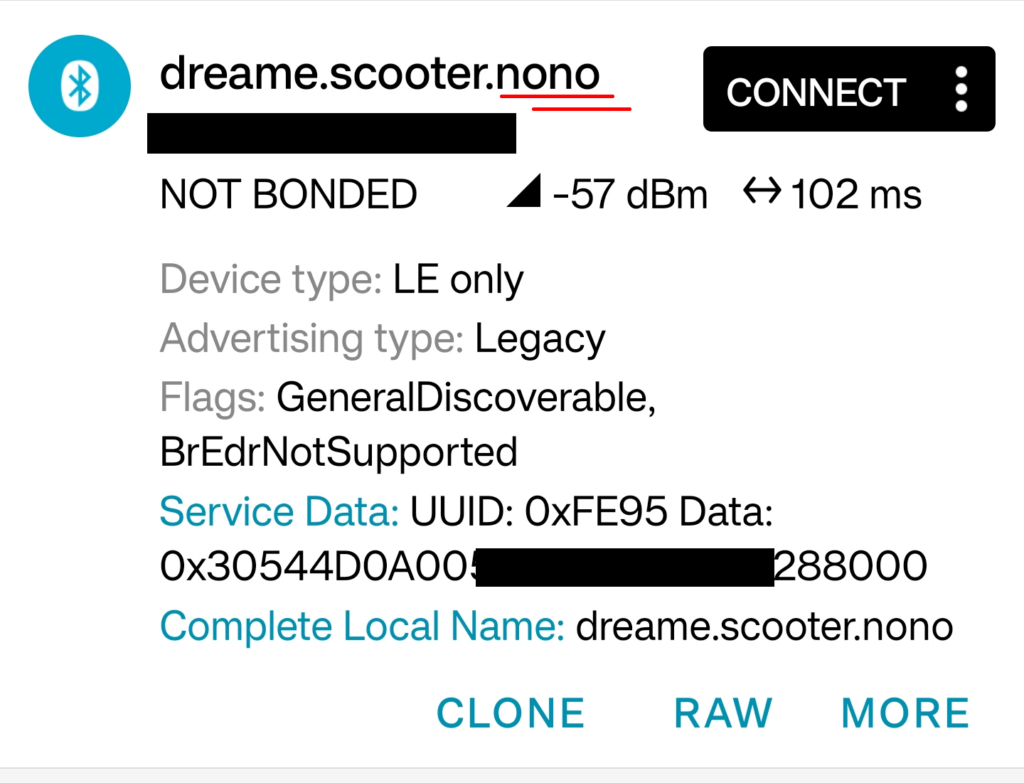
I was able to erase the existing firmware from the BLE module and flash a modified 3 Lite BLE firmware back to it. My modification, for demonstration, is simply changing the device name from „dreame.scooter.epro“ to „dreame.scooter.nono“ . This shows that a 3 Lite custom firmware could very much be possible, in theory!
Custom firmware can be flashed to LKS32MC081 MCU without limitations using the SWD port. After flashing the original 3 Lite MCU firmware, I was able to erase and reprogram the chip with a modified original firmware.
Thanks to internal FCC documents we can tell that the hardware of the Xiaomi/Brightway 3 Lite and the Xiaomi/Brightway 4 (non-Pro) model look similar. The MCU has the same amount of pins and we can make out exposed SWD pads. Overall, the board design, including caps and connectors, looks familiar. Chances are, that the 4 Ultra comes with the hardware described in this post.
The Xiaomi/Ninebot 4 Pro, like all other other new Xiaomi scooter models, uses the same BLE module as the 3 Lite, as disclosed by a Bluetooth certification. This means that the 4 Pro uses the same BLE stack and Xiaomi core libraries for authentication. As for the controller, the 4 Pro uses a STM32 based board in the tradition of previous Ninebot scooters; the STM32 MCU is well established in the scooter modding community.
In a nutshell, the new Xiaomi models could be pwned as follows:
For 3 Lite + 4 + 4 Ultra, the easy way would be to modify the existing MCU firmware and flash it via SWD. The hard way would be developing and flashing a custom BLE firmware for the (Realtek) BLE module that bypasses the secure chip, with a custom MCU OTA flashing procedure.
For the 4 Pro, there is no easy way at this time. A possible way is to develop and flash a custom ESC firmware for the STM32 board. This firmware could be based, for example, on the OpenSource SmartESC firmware. The hard way would involve a custom BLE firmware, just like for the other models (same BLE module).
In this research, I had an extensive look at the hardware, software and security implemented by Brightway, the new Xiaomi scooter supplier, by examining their 3 Lite scooter model. I could fully dump both the BLE and MCU flash content, get a glimpse at the OTA procedure and the command & communication protocol used by in the 3 Lite.
My conclusion is that Brightway scooters, at the example of the 3 Lite, are secure from hostile takeover by a third party, thanks to the use BLE authentication using the secure chip, but open for your own modifications!
I have shown that both chips can be (re-)programmed through the respective (enabled) SWD port: I was able to flash a modified 3 Lite BLE to an identical Xiaomi BLE module, which suggests that BLE custom firmware is possible on the actual device. I was also able to flash (and re-flash) the original 3 Lite MCU firmware to an identical LKS32 MCU, which suggestes that MCU custom firmware is possible.
At the time of writing, I could not discover any security exploits that would warrant a notification of the manufacturer. As for the security flaws, such as missing encryption and read-out protection of the firmware files, I assume that the manufacturer is well aware thereof. Please understand that I will not go into detail of the exact flashing procedures. Further, the question how regional restrictions such as speed limits can be removed are not the scope of my research.
Updated 2022-04-21: Added main picture, added in-depth details with references, added appendix, updated inaccurate paragraph on ESC firmware
Chinese tech giant Xiaomi started rolling out new security measures to counter illegal modification of their device’s firmware. I own a Xiaomi Mi 1S Electric Scooter and can tell that this product is affected. Out of personal curiosity I wanted to have a look…
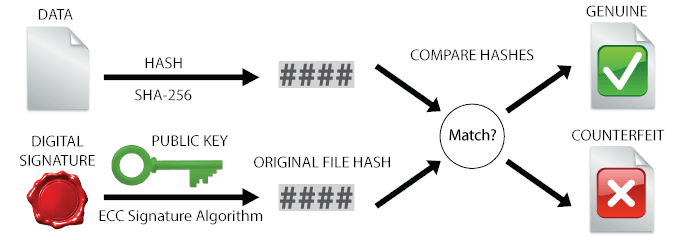
To inspect device firmware one doesn’t necessarily need access to the hardware (as demonstrated in the main picture) – intercepting the chip’s flashing process is much more convenient!
Today, the firmware of most electronic devices is updated „over-the-air“ (OTA). Meaning, the firmware file is no longer downloaded and installed by the user manually, but rather through an automated process. With OTA updates the user usually never gets to see the actual firmware.
Because firmware is subject to copyright laws the user no longer runs into the legal risk of accidentally sharing the file. On the downside, the user never gets to see the content of the installed files. After all, the firmware could contain code meant to spy on you or worse – you would never find out. Or could you?
Every update procedure involves downloading a file which is then installed onto the device. Just because these steps are invisible to the user it doesn’t mean that they don’t happen. The easiest way to capture the file is by sniffing network traffic. Another way is to access the filesystem or dump the RAM of the application used to perform the update.
The Xiaomi electric scooters actually come with three firmware files, one for each component: battery management system (BMS), electronic speed controller (ESC) and the dashboard BLE chip:
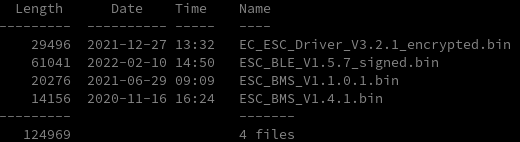
Simply observing the new firmware filenames one can see that the BLE firmware file is now equipped with a _signed appendix and ESC firmware starts with an EC_. With a brief look into the file contents one finds the same two certificates attached to the file ends:
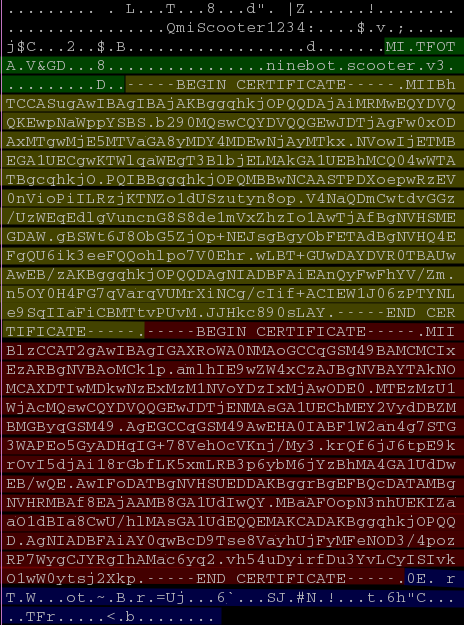
Running the attached certificates through openssl reveals the first one to be a root certificate (Mijia Root), the second one to be an application level certificate (Mijia Open) and the underlying cryptographic algorithm: ecdsa-with-SHA256.
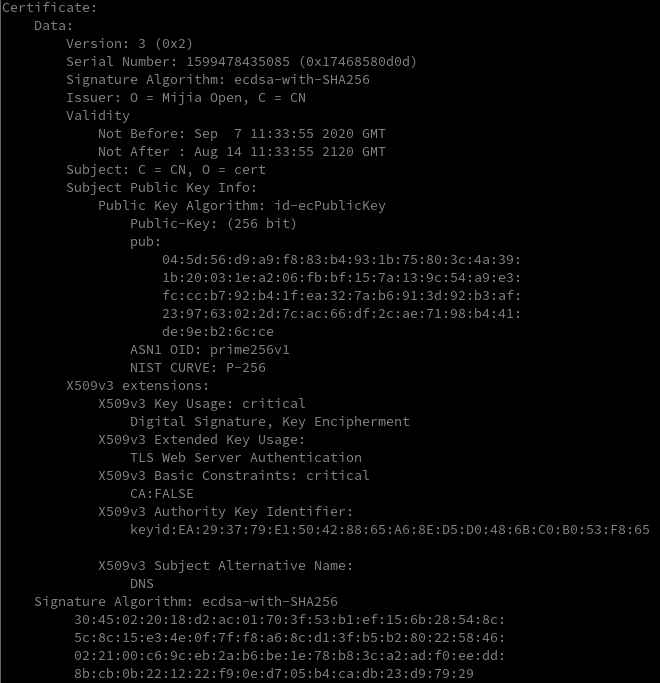
The Elliptic Curve Digital Signature Algorithm (ECDSA) uses public-key cryptography to validate the authenticity of the message/data. In public-key cryptography a pair of keys is generated: a private key and a public key. In Elliptic Curve cryptography (ECC) this pair is generated from (geometric/mathematical) elliptic curves. This is far more secure than lets say prime numbers in RSA.
SHA256 is a hash algorithm designed by the NSA. Meaning, no one besides the NSA can produce the data from the hash :). SHA256 produces a hash of 256 bit length for any input message/data.
In order to sign (or encrypt) data in public-key infrastructure a key pair is needed. Naturally, for ECDSA an EC key pair with private and public key is generated before all else.
To calculate the EC signature following three steps are then ran:
(To keep this post simple, formulas have been omitted and steps simplified.)
For signature validation, the public key is used to retrieve the original file hash back from digital signature. This file hash is than compared to the hash of the received data to tell whether the same data, which was signed, is received, or if it has been tampered with.
Back to our case: To validate the signed firmware files you can use my script from the appendix. It first separates the (application level) certificate and data signature (signature bytes follow after the last certificate) from the firmware data, and then runs openssl to verify the signature against the firmware data given the public key from the certificate. In short: Running the command bash verify.sh <firmware_file> will give you the message „Verified OK“ if the file was correctly signed.
Using this method, the verification for both captured firmware files succeeds. We can conclude that the firmware itself must be doing a similar verification.
We already know that the new BLE firmware is signed, but it’s also not encrypted. This means it can be disassembled and analyzed!
It’s easy to find out that the section containing the certificates (at the end of the file) is referenced from within the flash procedure [1]. And if a certain condition is not fulfilled the flash procedure never finalizes [2]. Based on the previous examinations of signature verification there’s reason to believe that the function involved in this condition compares the file hash of the received data against the original file hash calculated from the signature and public key contained in the certificate [3].
Furthermore, hints to a new flash procedure can be found in the BLE firmware [5]: It contains a whole new set of functions that (together with previously mentioned function for signature verification) are all situated in a block in the beginning of the firmware [4], indicating a newly added library. This new procedure is structurally similar to the existing flash procedure and it intercepts all flash commands designated to the ESC [6]. Scary stuff!
References (ESC_BLE_V1.5.7)
The ESC firmware can be decrypted in the same way as previous firmware files (after truncating the certificates), but the BLE firmware now acts as a gatekeeper: By monitoring the UART communication between dashboard (BLE) and controller (ESC) we observe that when performing the ESC update… nothing happens! Only after 50% progress the transmission of data from BLE to ESC starts (an excerpt of the new UART log can be found in the appendix). Previously, flash commands designated to the ESC where simply passed through the BLE.
Observing this behavior we can bridge a logical gap: The new flash procedure found in the BLE firmware (see last paragraph in previous section) is responsible for the memory management of all intercepted packets! Only after a full transfer and verification the procedure is finalized. Since both BLE and ESC firmware come with the same public key and a unique signature, the verification procedure must follow the same principle.
We summarize the new flash procedure for ESC firmware as follows:
The new security measures are on-par with today’s security standards. BLE firmware is signed using ECC and signatures only pass validation if they’re signed using the correct private key.
Xiaomi seems to have taken security concerns from users and authorities seriously. Instead of simply swapping out keys, new security features with signed firmware files have been implemented.
These measures can be seen as secure given the following context:
split.py – Python script to split firmware file into data, certificate and signature (root certificate omitted):
import sys

if __name__ == "__main__":
    filename = sys.argv[1]
    with open(filename, 'rb') as f:
        data = f.read()

        pattern = b"\x2d\x2d\x2d\x2d\x2d"
        i = data.find(pattern, 0xdfff)
        if i == -1:
            i = data.find(pattern)
        fw, appendix = data[:i], data[i:]

        i_s = appendix.rfind(pattern)
        i_ce = appendix.rfind(pattern, 0, i_s)
        i_cs = appendix.rfind(pattern, 0, i_ce)
        sign = appendix[len(pattern)+1+i_s:]
        cert = appendix[len(pattern)+1+i_cs:i_ce]

        with open(filename + ".data", 'wb') as outf:
            outf.write(fw)
        with open(filename + ".cert", 'wb') as outf:
            outf.write("-----BEGIN CERTIFICATE-----\n".encode())
            outf.write(cert)
            outf.write("-----END CERTIFICATE-----\n".encode())
        with open(filename + ".sign", 'wb') as outf:
            outf.write(sign)
verify.sh – Bash script to verify the firmware against the appended signature and public key:
# 1. split BLE_signed into three parts: data + certs + signature
python split.py $1

# 2. extract pub_key from cert
openssl x509 -in "$1.cert" -noout -pubkey -out "$1.pub"

# 3. verify data using pub_key and signature
openssl dgst -verify "$1.pub" -keyform PEM -sha256 -signature "$1.sign" -binary "$1.data"
UART log showing delayed start of ESC flash process:
... (after ~50% progress) ...
55aa0320017f025aff
55aa0423017fc16b2cfe
55aa0320017f025aff
55aa0423017fc16b2cfe
55aa04200270010068ff
55aa032302700166ff
55aa06200700006e000064ff
55aa062061b20202292475fe
55aa0320017f025aff

55aa02230700d3ff
55aa042301b202081bff
55aa0423017fc16b2cfe
55aa82200800774019f6456798d91633253245117bb42fda8615773a193048ac6ca5e7887a    +++9c234555c92c4a4d859272586ced17e9870a2595f14d09fc57ac2a3f458ec2747a67a43    +++d9cb848dee0e60a61e37f77007626122be78bb9bb75f1f47eab43db66f791e5e4c83c5c    +++944f892ab056f19d0fe2a4c2a7949a9cb53aba77e15fa3cdd454f8bf

55aa02230800d2ff
55aa82200801b54e0814f03f3514412eb5d248c0df64b01510b93f9bebdada5ffb5bd2e137    +++b0503272551b249e5e5cb65df0d6258ef2588c50e45658f5afc81993f69f843eeb124d0    +++f5ef52ef9391fd54ca3f0f766812e4a768539741a3ed3a667411f6397e84f667095cf38    +++1cfdc4e946fba41ae24cb996340d0b6faf9c43cc62aa8e3a4bcc39c0
...openssl req -new -x509 -keyout server.pem -out server.pem -days 365 -nodesStill possible in 2022, thanks to a little tool going by the name „burpsuit“. It’s easy: Set up a proxy server and configure your end device to use that proxy.
Starting with Android Nougat the cert has to be installed at system-level. For this, you have to enable root debugging in the developer settings and transfer the file manually using adb. Full explanation here.
openssl x509 -inform der -in burp.der -out burp.pem
mv burp.pem openssl x509 -inform pem -subject_hash_old -in burp.pem | head -1.0
With adb root move cert to /system/etc/security/cacerts/ and chmod 644.