Kategorien
Security

Sniffing HTTPS traffic

Still possible in 2022, thanks to a little tool going by the name „burpsuit“. It’s easy: Set up a proxy server and configure your end device to use that proxy.

Starting with Android Nougat the cert has to be installed at system-level. For this, you have to enable root debugging in the developer settings and transfer the file manually using adb. Full explanation here.


openssl x509 -inform der -in burp.der -out burp.pem

mv burp.pem openssl x509 -inform pem -subject_hash_old -in burp.pem | head -1.0

With adb root move cert to /system/etc/security/cacerts/ and chmod 644.

Kategorien
RevEng

Patching APK’s

Ever run into a situation where you can no longer use an older version of an app because it forces you to update? Or the app tries to take money from for unlocking an already built-in but inaccessible „premium feature“?

Patching APK’s consists of these steps:

  1. Unpacking the APK: apktool d -r some.apk -o output_dir
  2. Patching the smali byte-code: Remove or change using your favorite editor
  3. Packing the code back to an APK: apktool b output_dir -o modded.apk
  4. Signing the new APK:
    1. Create key (only needed once): keytool -genkey -v -keystore key.keystore -alias robocoffee -keyalg RSA -keysize 2048 -validity 10000
    2. Sign with key: jarsigner -verbose -sigalg SHA1withRSA -digestalg SHA1 -keystore key.keystore modded.apk robocoffee ~/Android/Sdk/build-tools/<version>/apksigner sign --ks key.keystore modded.apk
  5. Install new APK: adb install modded.apk
Kategorien
RevEng

Decompiling APK’s

You can decompile even minified / obfuscated APK’s using one of these tools (I prefer the latter). Why would you want to do that? For example, when you like a feature in an App and reverse-engineer how it’s done.

Decompile into Java source code using Procryon:

  1. apktool d -s some.apk -o output_dir
  2. dex2jar output_dir/classes.dex
  3. procyon-decompiler classes-dex2jar.jar -o decompiled_dir

Or alternatively, one tool to rule them all: jadx --deobf some.apk

In my opinion JADX with the built-in deobfuscator gives the most readable results. Note however that some blocks might now be decompiled in either case, leaving you no other option but to read nasty byte-code.

Kategorien
Hardware Stupid

How to toast a micro controller

  1. Short peripheral chip by applying the wrong voltage to either one of its inputs
  2. Connect the shorted chip to your micro controllers power outputs, effectively shorting it too

Lesson: Don’t mess with micro controllers in the middle of the night, especially not when you’re tired and lazy.

Kategorien
Phone

Flashing Android custom rom

Why bother? Because your stock Android phone probably comes with a sh1tload of applications you don’t need and is infested with Google spy tools. Many custom roms build on top of AOSP (Android Open Source Project) and tailor it for your phone’s hardware. My favorite project is LineageOS, the successor of the now defunct CyanogenMod. But to be honest, I haven’t tried much else.

AOSP roms come without any Google applications (short: GApps) to begin with. But since life without Play Store and Play Services is going to be difficult, you’re going to want to have a minimum set of GApps. To get those, right after flashing your custom rom*, flash a GApp package. There are different packages out there, NikGapps, MindTheGapp, OpenGapps. I highly recommend going with OpenGapps because it allows you to restore your Google Backup! Also note that.

* If you accidentally reboot into system after flashing the custom rom, do a factory reset (only resets the new OS), then go directly back into TWRP and flash your GApps package.

Kategorien
Phone Stupid

How to brick your Android phone

Steps:

  1. Make sure your phone is encrypted
  2. Unlock the bootloader (OEM unlocking)
  3. Erase user-data partition

Not enough! Your device seems bricked, but since you can enter recovery mode it can be saved by reformatting the filesystem (ext2 -> ext4, repair system).

To actually brick your device:

  1. Boot your phone into fastboot mode
  2. Make sure the bootloader is unlocked
  3. With the fastboot command flash a new boot.img to the boot partition
  4. Done

Interesting facts about Android:

  • When unlocking the bootloader all your data gets wiped
  • Does not let you downgrade to older firmware versions

Also don’t ever rely on the Google backup function:

  • Google backups can only be restored on initial system setup
  • Google backups don’t contain any app data (so what’s the point of this backup?)
  • Google will sync your phone contacts into your Google account, the contacts you backed up can not be restored otherwise
  • System settings are all lost even if you backed them up

Instead, backup your data using OEM tools (OnePlus Clone, Samsung whatever ..).

Kategorien
Phone

How to unbrick your Android phone

If you’ve completely bricked your Android phone and the screen stays black, don’t give up just yet! There’s still a chance. Because all Android phones use a Qualcomm processor it is possible to directly communicate with the chip the „EDL“ (emergency something…) mode. Then you will need a special tool and a decrypted firmware file to flash. If you’re lucky, you can find all of this in the interwebs for your phone model.

So what’s needed?

  • Windows… with signature verfication turned off („Test Mode“)
  • Qualcomm Driver
  • Decrypted Firmware (.osp)
  • MSMDownloadTool to flash the firmware

To put your phone into the EDL mode the simplest way I found is this: Turn off phone, hold both Volume Buttons while plugging in the USB cord.

Once that’s done you will have a phone that’s gone through a true factory reset. Now you have a stock phone with the firmware it originally came with. Next surprise: once your device back up running you won’t be offered any system upgrades, at all. Why? Because the update servers deliver incremental updates, and they no longer host updates for your outdated phone. It gets better: If you manually try to upgrade to the latest OS and the version difference is too high, the upgrade will fail.

The solution is that you do incremental updates to latest version manually starting from your current version (the way your system usually is updated), e.g. Android 8 -> 9 -> 11. You can find the OTA (over-the-air) update files online. At least for OxygenOS you can also use the „Oxygen Updater“ App, it downloads the OTA’s in the correct order for you.

Kategorien
Radio

MQTT

MQTT is a communication protocol for IoT devices. It is super cool, but setting it up can be confusing. It consists of a MQTT broker, a central node that all clients connect to and which is responsible for handling and passing on messages, and the the MQTT clients. Since Arduino comes with a MQTT you can build a MQTT client into all sorts of things.

If you use OpenHab you will have to set up the following „Things“:

  • MQTT broker bridge: connects to broker
  • MQTT thing: connects to bridge
Kategorien
Radio

433 hacking

How do you control RC switches without a remote? The answer is by using a 433 mHz transmitter in combination with a microcontroller or RPi. Many switches have already been decoded and are part of the rc-switch library. If not, like in my case, you have to record the analog signals and decode them yourself. But the process is straight-forward, thanks to this guide: https://github.com/sui77/rc-switch/wiki/Add_New_Remote_Part_1

Kategorien
Brewing

Homebrew: 2. Läutern

For the „Läutern“ (or „Abläutern“) step a „Läuterbottich“, a tub / bucket with a sieve inlay and outlet tap, is commonly used. The wort („Würze“) is transferred into the Läuterbottich and left for a defined resting time, the „Läuterruhe“. During this time the draff („Treber“) sets down onto the sieve and acts as an additional, finer natural sieve.

The wort is then cleared in two steps: 1. „Hauptguss“ (main pour) 2. „Nachgüsse“ (post pours).

  1. In the Hauptguss the first wort („Vorderwürze“) is progressively tapped off poured over the draff cake. This is repeated until the wort is clear and free of any trub, where the wort is ultimately transferred back into the brewing kettle.
  2. In the Nachguss additional water, matching the temperature of the wort, is progressively poured over the draff cake to extract the remainder of wort. The amount of water needed for the Nachguss is determined by the type of malt and target original extract of the wort („Stammwürze“). Once the draff is dry the newly won wort joins the brewing kettle.

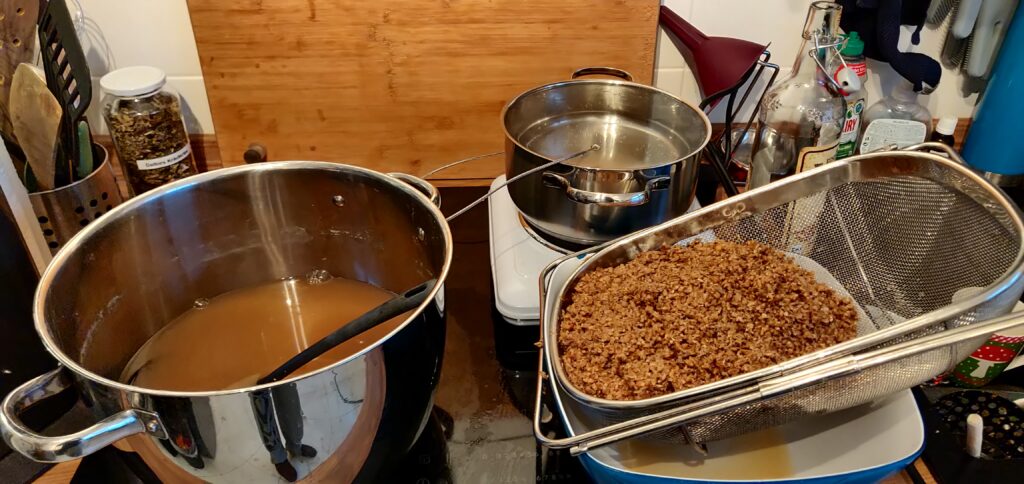
In my first brew I wasn’t equipped with a Läuterbottich and had to rely on different containers for filtration. This has a huge downside: because the draff is exposed to air it quickly cools down – now, when the Nachguss is poured over the draff the water temperature could drop sharply, which in order would lead to a incomplete / uneven extraction.